
Exchange Server supports user mailboxes and shared mailboxes. User mailboxes are used by people who log in to their mailbox to send and receive e-mail. Shared mailboxes do not have an active user account, but represent a department, group, or service. Examples of shared mailboxes are those used by departments like sales, marketing, human resources, service desk, etc. Shared mailboxes have a disabled Active Directory account and do not need an Exchange client access license or an Exchange Online license.
Users must be granted permissions to interact with a shared mailbox. Permissions are granted to allow users to:
- Access a shared mailbox and work with the items in the shared mailbox.
- Impersonate the shared mailbox and send email as that mailbox.
- Send email on behalf of a shared mailbox.
Access works without a problem in a pure Exchange 2019 environment, but in an Exchange hybrid environment, things can be different and not work as you expect. In this article, I discuss the permissions when using shared mailboxes in Exchange 2019 and Exchange hybrid environments.
Shared Mailbox Permissions in Exchange 2019
Exchange Server has two ways to grant permissions to a shared mailbox:
- Grant permissions directly to a user mailbox. The advantage of this option is that it enables a feature called automapping. With automapping, Outlook automatically detects shared mailboxes that the user has full access to and configures its profile accordingly to display the mailboxes in its list of resources.
- Grant permissions to a group in Active Directory and add users to the group. The advantage of this option is easier administration. Add a user to the correct group in Active Directory and that’s it. Unfortunately, automapping does not work in this scenario.
Granting Full Access Permission
To grant a user or a group Full Access permissions to a shared Mailbox, open the Exchange Admin Center and navigate to Recipients, then go to Shared, and open the properties of the shared mailbox. In the properties window, select Mailbox Delegation and use the + icon to add the user or group to the Full Access list. To grant the user the Send As permission to the shared Mailbox, add the user to the Send As list as well.
Using the Exchange Admin Center always works when granting a user access to a shared mailbox. However, the Exchange Admin Center can only assign full access to mail-enabled groups. For security or distribution groups that are not mail-enabled, you must use PowerShell to grant a group full access to a shared mailbox.
Here’s a PowerShell example showing how to grant a user full access to a shared mailbox called ‘Sales’:
If you don’t want to enable the automapping feature, specify the -Automapping option when adding the mailbox permission. For example:
The code is much the same to grant full access to a group called Sales_FullAccess:
You can use the Exchange Admin Center to check which mailboxes have Full Access to a shared mailbox, but I prefer to use the Get-MailboxPermission cmdlet. By default, the SELF and SYSTEM users have full access to a mailbox, so these must be filtered out. To check who has full access permissions to a shared mailbox use code like this:
NT AUTHORITY\SELF represents the user that ‘owns’ the mailbox. System accounts have permissions on a mailbox database level, and mailboxes inherit these permissions, hence the -IsInherited -eq $False option in the output.
Granting Send As Permission
The Send As permission is not a mailbox permission. Instead, it is an Active Directory permission. To grant the user D.Jones the ‘Send As’ permission to a shared mailbox called ‘Sales’ run the following code:
Similarly, to grant a group called Sales_SendAs the Send As permission to the same shared mailbox, run this code:
You can use the Exchange Admin Center to check which accounts have Send As permission on a shared mailbox, but I prefer to use PowerShell. To check which accounts have Send As permission on a shared mailbox called ‘Sales’ you can use the following example:
Send on Behalf Permissions
Exchange 2019 doesn’t support granting a user or group the ‘Send on Behalf’ permission through the Exchange Admin Center, but it can be done with PowerShell. Use the following example to grant a user B.Brown the ‘Send on Behalf’ permission to a shared mailbox called ‘sales’:
Send on Behalf is a mailbox property, so it is easy to find out who has this permission for a mailbox. Here’s the PowerShell command to check who has the Send on behalf permission on a shared mailbox called ‘Sales’:
Shared Mailbox Permissions in an Exchange 2019 Hybrid Environment
In an Exchange hybrid deployment things are different. Objects and their properties are managed on-premises and the Entra Connect server replicates objects from Active Directory to Entra ID and Exchange Online.
In an Exchange hybrid environment, mailboxes exist in Exchange 2019 and in Exchange Online. This can cause some challenges and frustrations when it comes to cross-premises use of shared mailboxes. For permissions to work correctly in an Exchange hybrid environment, there are a couple of prerequisites:
- The minimum required version of Entra Connect is 1.1.553.0. Since Entra Connect version 1.x is out of support as of October 1, 2023, you should be using version 2.x. It is strongly recommended to use the latest 2.x version of Entra Connect (download the software here).
- The ACLable object synchronization must be enabled in the organization configuration for Exchange Server by setting the ACLableSyncedObjectEnabled property to enable Access Control Lists (ACLs) on mailboxes that are moved to Exchange Online. Use the following command in Exchange Management Shell to enable this:
- Exchange hybrid must be configured in Entra Connect, as shown in Figure 1. This will synchronize the properties that enable hybrid mailbox permissions.

If you already have moved mailboxes from Exchange 2019 to Exchange Online but did not enable the ACLable object synchronization, you can enable it on individual mailboxes that were moved previously.
To enable the setting on a remote mailbox named ‘marketing’, use this PowerShell command on Exchange 2019:
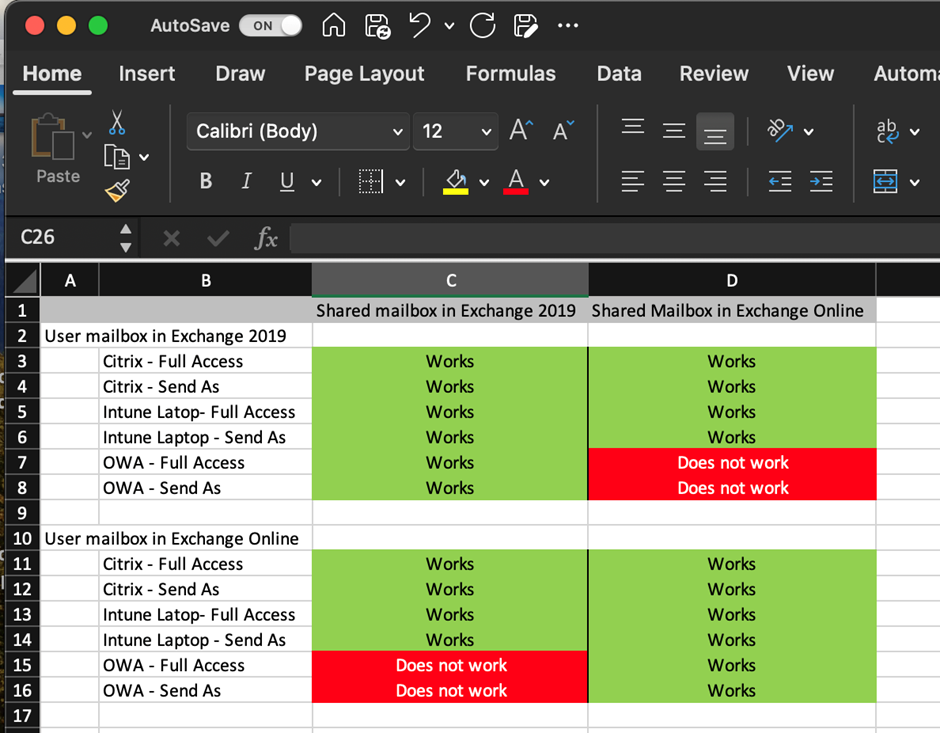
According to the Microsoft article Permissions in Exchange hybrid deployments, Full Access and the Send on Behalf permissions are fully supported in an Exchange hybrid deployment. The Send As permission is not supported in an Exchange hybrid deployment, but it will work in most scenarios if the Send As permission is manually configured in both environments.
Normally, in a migration project, I test what functionality works and what does not. The outcome is in a functionality matrix that makes it easier for (project) management to understand what’s going on. An example from my latest migration project with clients in Citrix and Microsoft Intune-managed laptops is shown in Figure 2.
Checking Permissions in Exchange Online
When the mailbox is migrated to Exchange Online the permissions are migrated as well. To check this, open the Exchange Online Admin Center and navigate to Recipients à Mailboxes. Select the properties of the shared mailbox and select the delegation tab. Both the ‘Send As’ and the ‘Read and Manage (Full Access)’ must be identical to the permissions before the migration.
To check mailbox permissions with PowerShell, use the following example:
Use this command to check for Send As permissions:
Please note the difference with checking in Exchange 2019 where the Get-ADPermissions cmdlet is used to check for the ‘Send As’ permission.
In Exchange Online, Send on behalf is assigned using the GrantSendOnBehalfTo mailbox property. When requesting this property, PowerShell returns the GUID of the trustee. To return the displayName of the trustee, use the following example:
Granting Permissions in Exchange Online
To set permission on an Exchange Online shared mailbox, open the Exchange Admin Center and navigate to Recipients, then Mailboxes. Open the properties of the mailbox and select the Delegation tab. Here you can set the Full Access and Send As permissions. Click Edit and use click +Add Members to add a trustee to the mailbox. Please note that it is not possible to grant the Send on behalf permission using the Exchange Admin Center.
Of course, it is also possible to use PowerShell in Exchange Online to grant the permissions to a shared mailbox. Use the following example to grant Full Access permissions to a user called CloudAssistant on the CloudShared mailbox:
The next example grants the Send As permissions to the same user on the same mailbox. Note that the Add-RecipientPermission command is used instead of the Add-ADPermission in Exchange 2019:
As mentioned before, the Send on behalf is a property on a mailbox, so to grant the Send on behalf permission to a user called d.jones on the CloudShared mailbox use this command:
Note. In Exchange 2019, you can use non-mail-enabled global groups to grant permissions on a shared mailbox. This will not work when these groups are synchronized using Entra ID Connect. For this to work, the group must be mail-enabled in Exchange 2019 and then synchronized using Entra ID Connect.
Summary
Shared mailboxes are widely used in Exchange. It is relatively simple to set and manage permissions on shared mailboxes in Exchange on-premises environments. However, in an Exchange hybrid environment, where mailboxes can be in Exchange 2019 or in Exchange Online, things can become complex very quickly. Full Access permissions and Send on behalf permissions are fully supported in a hybrid environment when all prerequisites are met, but the Send As permission is not. But, according to Microsoft, it works in most scenarios. That’s also my personal experience, but there are situations where things don’t work as desired.
Make a matrix with the possible scenarios and write down which scenarios work, and which don’t work in your environment.
To prevent permission issues in a hybrid environment, it is good practice to keep mailboxes and delegates on the same platform to prevent the need for cross-premises shared mailboxes. Discovering the details of mailbox delegates and making sure that everything works following a migration can be the most difficult part of any migration to Exchange Online.
.png)
This Content Sponsored by SBO Digital Marketing.
Mobile-Based Part-Time Job Opportunity by SBO!
Earn money online by doing simple content publishing and sharing tasks. Here's how:
- Job Type: Mobile-based part-time work
- Work Involves:
- Content publishing
- Content sharing on social media
- Time Required: As little as 1 hour a day
- Earnings: ₹300 or more daily
- Requirements:
- Active Facebook and Instagram account
- Basic knowledge of using mobile and social media
For more details:
WhatsApp your Name and Qualification to 9994104160
a.Online Part Time Jobs from Home
b.Work from Home Jobs Without Investment
c.Freelance Jobs Online for Students
d.Mobile Based Online Jobs
e.Daily Payment Online Jobs
Keyword & Tag: #OnlinePartTimeJob #WorkFromHome #EarnMoneyOnline #PartTimeJob #jobs #jobalerts #withoutinvestmentjob
