
Saturday, August 17, 2024

Friday, November 23, 2018
Computer Network | Layers of OSI Model
OSI stands for Open Systems Interconnection. It has been developed by ISO – ‘International Organization of Standardization‘, in the year 1974. It is a 7 layer architecture with each layer having specific functionality to performed. All these 7 layers work collaboratively to transmit the data from one person to another across the globe.
1. Physical Layer (Layer 1) :
The lowest layer of the OSI reference model is the physical layer. It is responsible for the actual physical connection between the devices. The physical layer contains information in the form of bits. It is responsible for the actual physical connection between the devices. When receiving data, this layer will get the signal received and convert it into 0s and 1s and send them to the Data Link layer, which will put the frame back together.
The functions of the physical layer are :
- Bit synchronization: The physical layer provides the synchronization of the bits by providing a clock. This clock controls both sender and receiver thus providing synchronization at bit level.
- Bit rate control: The Physical layer also defines the transmission rate i.e. the number of bits sent per second.
- Physical topologies: Physical layer specifies the way in which the different, devices/nodes are arranged in a network i.e. bus, star or mesh topolgy.
- Transmission mode: Physical layer also defines the way in which the data flows between the two connected devices. The various transmission modes possible are: Simplex, half-duplex and full-duplex.
* Hub, Repeater, Modem, Cables are Physical Layer devices.
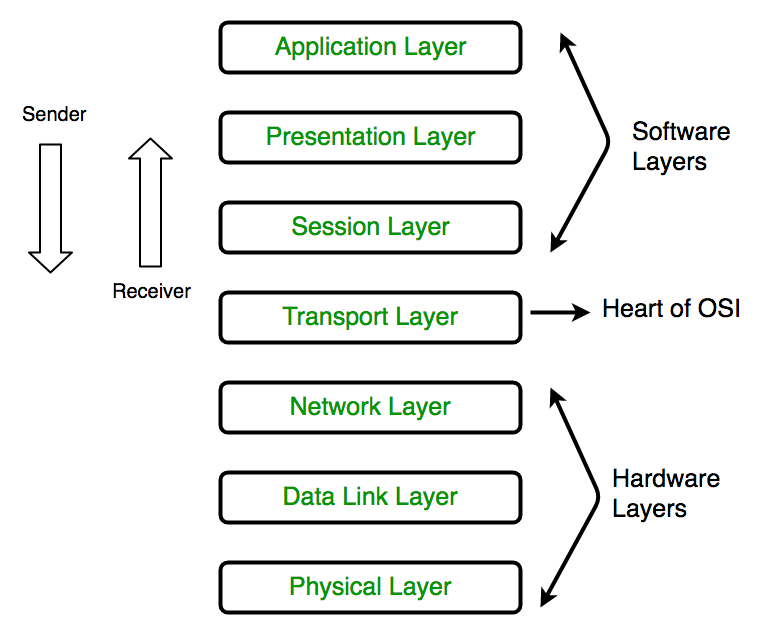
** Network Layer, Data Link Layer and Physical Layer are also known as Lower Layers or Hardware Layers.
** Network Layer, Data Link Layer and Physical Layer are also known as Lower Layers or Hardware Layers.
Windows 10 - Installation
There are two approaches you can take for installing Windows 10 in your computer: Upgrade or a Clean Install.
Typically, when you upgrade your operating system, all your documents and applications remain unchanged, whereas with a clean install you would be starting again from scratch. But one important thing to verify first is if your computer has the necessary hardware to support Windows 10.
System Requirements
Although most computers nowadays probably have the necessary requirements for Windows 10. It will certainly be useful to know them in case you want to upgrade from an older system.
The main requirements are −
- A processor (CPU) with a clock rate of at least 1GHz.
- At least 1 to 2GB of memory (RAM), but Microsoft recommends 4GB.
- At least 16GB space in your hard disk.
One important thing to note is that the installation process itself will verify your computer hardware and let you know if it qualifies for a Windows 10 upgrade or not. If not, then you will need to upgrade your hardware.
Upgrade
If your computer qualifies for a Windows 10 upgrade, then you can follow these steps to perform the upgrade −
Friday, May 4, 2018
10 Cool Command Prompt Tricks You Should Know
- If you want to use command prompt on Windows 10 more efficiently, you should know some CMD tricks. Well, we bring you 10 hidden Command Prompt tricks & hacks you should know.
- Video Walkthrough and Tricks
2. Change CMD color
3. Change prompt text
4. Change title of the Window
5. Watch Star Wars in ASCII
7. Hide Folders
6. Create WiFi Hotspot
9. List all installed programs
8. Copy Command Output to Clipboard
10. Open a CMD window in a directory
Windows 10 April 2018 update: everything you need to know
- Microsoft has released the latest version of Windows 10, adding improvements to task management, Cortana, Edge and sharing.
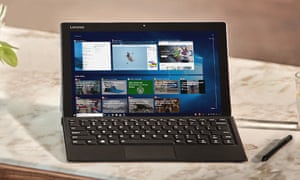
- The next version of Windows 10 is finally ready to download as a free update that adds some potentially game-changing new features as well as some welcome features that bring it up to par with what you might expect from a smartphone.
- Instead of adding tools for people creating media, as the previous two updates have, the latest version of Windows 10 is focused on time and task management.
- “We want to give you back some of your greatest currency, your time. Our hope is that you’ll have more time to do what matters most to you – create, play, work or simply do what you love,” said Yusuf Mehdi, corporate vice president of Microsoft’s Windows and Devices group.
Cloud Computing - Overview
- The popular trend in today's technology driven world is ‘Cloud Computing’. Cloud computing can be referred to as the storing and accessing of data over the internet rather than your computer's hard drive. This means you don't access the data from either your computer's hard drive or over a dedicated computer network (home or office network). Cloud computing means data is stored at a remote place and is synchronized with other web information.
- One prominent example of cloud computing is Office 365 which allows users to store, access, edit their MS Office documents online (in browser) without installing the actual program on their device.
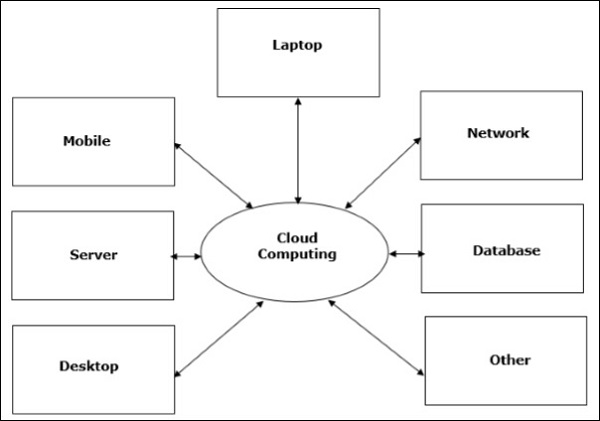
Architecture of Cloud Computing
- The architecture of cloud computing comprises of the following components −
- Front-end device
- Back-end platform
- Cloud-based delivery
- Network
- Front-end Devices − These are basically the devices that are used by clients to access the data or program using the browser or special applications.
- Back-end Platform − There are various computers, servers, virtual machines, etc. that combine to become a back-end platform.
Thursday, May 3, 2018
Installing Windows Server 2012 Step-by-Step
Windows Server 2012 R2 Hardware Requirements
As with previous Windows versions, your hardware must meet certain requirements for Windows Server 2012 R2 to function properly. First of all, Windows Server 2012 R2 requires a 64-bit processor; Microsoft has discontinued 32-bit software with this release of Windows Server. Table outlines the minimum and recommended hardware requirements for Windows Server 2012 R2 as provided by Microsoft:

Installing a Windows Server Core Computer
- Insert the Windows Server 2012 R2 DVD-ROM and turn on your computer. You should see a message informing you that Windows is copying temporary files; if not, you should access the BIOS setup program included with your computer and modify the boot sequence so that the computer boots from the DVD.
- After a few minutes, you receive the Windows Server 2012 R2 screen. Click Install now to begin the installation.

- Windows copies temporary files and then displays the Get important updates for Windows Setup screen. If you’re connected to the Internet, select Go online to install updates now (recommended).
Subscribe to:
Posts (Atom)
