Tuesday, December 17, 2024

How to Index Blog Post In Google search console In 2025 [Step By Step Guide for Beginners]

Search engine traffic is the key to building any profitable blog. But here’s the thing: if Google doesn’t index your site, you will NOT get a single visitor.

If you want Google to rank your pages, index your site first. Whether you are looking for Google to index your new site or blog post to quickly index your new blog posts, this post is for you.

The first thing you want to happen after launching a blog or website is to get it indexed by Google. Not indexing a site on Google is one of the biggest mistakes most new bloggers make.

The very first thing you need to remember is: that it’s free to index your new sites on Google. You don’t have to pay anything. But doing it for the first time is tricky.

1. Submit your website to Google

If you want to get Google to index your new site, you must submit your URL to Google from Google Search Console (GSC). For that, you need to create a free account on Webmaster tools using your Google account.

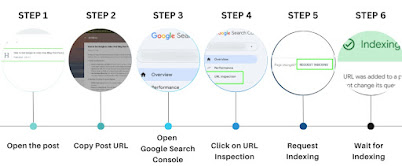
Here’s a simple step-by-step tutorial on how to submit your site to Google so it can start being indexed in search results.

Step 1: Click here to visit Google Search Console. Once you click on the link, you’ll be asked to select a property type.

s you can see above, you’ll find two options. One is to enter a domain name or URL prefix.

For domain type, DNS (Domain Name Service) verification is required whereas, for URL prefix, you can find multiple verification methods.

Step 2: We recommend you to try their URL prefix as it allows you to verify your site’s ownership in multiple methods. Once you enter your site’s URL address, here’s what it shows.

As you can see above, it asks you to verify your ownership.

Monday, December 9, 2024

What is OSI Model? – Layers of OSI Model: Physical Layer, Data Link Layer, Network Layer, Transport Layer, Session Layer, Presentation Layer, Application Layer

The OSI (Open Systems Interconnection) Model is a set of rules that explains how different computer systems communicate over a network. OSI Model was developed by the International Organization for Standardization (ISO). The OSI Model consists of 7 layers with specific functions and responsibilities.


This layered approach makes it easier for different devices and technologies to work together. The OSI Model provides a clear structure for data transmission and managing network issues. It is widely used as a reference to understand how network systems function.

In this article, we will discuss the OSI Model and each layer of the OSI Model in detail. We will also discuss the flow of data in the OSI Model and how the OSI Model is different from the TCP/IP Model.

OSI-Model

OSI Model

Aiming for a top All India Rank in the GATE CS & IT 2025 exam, but not sure where you stand?
We’ve got you covered! Our GATE CS & IT Test Series – 2025 is designed to give you the edge you need. With previous year's questions, subject-wise and full-length mock tests, and the All India mock Test, you can get a real feel of the exam. Plus, get our live mentorship classes with experts and attend live doubt-solving sessions to clear all your queries.

Layers of the OSI Model

There are 7 layers in the OSI Model and each layer has its specific role in handling data. All the layers are mentioned below:

  • Physical Layer
  • Data Link Layer
  • Network Layer
  • Transport Layer
  • Session Layer
  • Presentation Layer
  • Application Layer

Layer 1 – Physical Layer

The lowest layer of the OSI reference model is the Physical Layer. It is responsible for the actual physical connection between the devices. The physical layer contains information in the form of bits. The physical Layer is responsible for transmitting individual bits from one node to the next. When receiving data, this layer will get the signal received convert it into 0s and 1s, and send them to the Data Link layer, which will put the frame back together. Common physical layer devices are Hub, Repeater, Modem, and Cables.

physical-layer-in-OSI

Physical Layer

Functions of the Physical Layer

  • Bit Synchronization: The physical layer provides the synchronization of the bits by providing a clock. This clock controls both sender and receiver thus providing synchronization at the bit level.
  • Bit Rate Control: The Physical layer also defines the transmission rate i.e. the number of bits sent per second.
  • Physical Topologies: The physical layer specifies how the different, devices/nodes are arranged in a network i.e. bus topology, star topology, or mesh topology.
  • Transmission Mode: The physical layer also defines how the data flows between the two connected devices. The various transmission modes possible are Simplex, half-duplex, and full-duplex.

The data link layer is responsible for the node-to-node delivery of the message. The main function of this layer is to make sure data transfer is error-free from one node to another, over the physical layer. When a packet arrives in a network, it is the responsibility of the DLL to transmit it to the Host using its MAC address. The packet in the Data Link layer is referred to as Frame. Switches and Bridges are common Data Link Layer devices.

The Data Link Layer is divided into two sublayers:

  • Logical Link Control (LLC)
  • Media Access Control (MAC)

The packet received from the Network layer is further divided into frames depending on the frame size of the NIC(Network Interface Card). DLL also encapsulates the Sender and Receiver’s MAC address in the header.

The Receiver’s MAC address is obtained by placing an ARP(Address Resolution Protocol) request onto the wire asking “Who has that IP address?” and the destination host will reply with its MAC address.

Functions of the Data Link Layer

  • Framing: Framing is a function of the data link layer. It provides a way for a sender to transmit a set of bits that are meaningful to the receiver. This can be accomplished by attaching special bit patterns to the beginning and end of the frame.
  • Physical Addressing: After creating frames, the Data link layer adds physical addresses ( MAC addresses ) of the sender and/or receiver in the header of each frame.
  • Error Control: The data link layer provides the mechanism of error control in which it detects and retransmits damaged or lost frames.
  • Flow Control: The data rate must be constant on both sides else the data may get corrupted thus, flow control coordinates the amount of data that can be sent before receiving an acknowledgment.
  • Access Control: When a single communication channel is shared by multiple devices, the MAC sub-layer of the data link layer helps to determine which device has control over the channel at a given time.

Layer 3 – Network Layer

The network layer works for the transmission of data from one host to the other located in different networks. It also takes care of packet routing i.e. selection of the shortest path to transmit the packet, from the number of routes available. The sender and receiver’s IP address are placed in the header by the network layer. A segment in the Network layer is referred to as Packet. The network layer is implemented by networking devices such as routers and switches.

Functions of the Network Layer

  • Routing: The network layer protocols determine which route is suitable from source to destination. This function of the network layer is known as routing.
  • Logical Addressing: To identify each device inter-network uniquely, the network layer defines an addressing scheme. The sender and receiver’s IP addresses are placed in the header by the network layer. Such an address distinguishes each device uniquely and universally.

Layer 4 – Transport Layer

The transport layer provides services to the application layer and takes services from the network layer. The data in the transport layer is referred to as Segments. It is responsible for the end-to-end delivery of the complete message. The transport layer also provides the acknowledgment of the successful data transmission and re-transmits the data if an error is found. Protocols used in the Transport Layer are TCP, UDP  NetBIOS, and PPTP.

At the sender’s side, the transport layer receives the formatted data from the upper layers, performs Segmentation, and also implements Flow and error control to ensure proper data transmission. It also adds the Source and Destination port number in its header and forwards the segmented data to the Network Layer.

  • Generally, this destination port number is configured, either by default or manually. For example, when a web application requests a web server, it typically uses port number 80, because this is the default port assigned to web applications. Many applications have default ports assigned.

At the Receiver’s side, the Transport Layer reads the port number from its header and forwards the Data that it has received to the respective application. It also performs sequencing and reassembling of the segmented data.

Functions of the Transport Layer

  • Segmentation and Reassembly: This layer accepts the message from the (session) layer, and breaks the message into smaller units. Each of the segments produced has a header associated with it. The transport layer at the destination station reassembles the message.
  • Service Point Addressing: To deliver the message to the correct process, the transport layer header includes a type of address called service point address or port address. Thus by specifying this address, the transport layer makes sure that the message is delivered to the correct process.

Services Provided by Transport Layer

  • Connection-Oriented Service
  • Connectionless Service

Layer 5 – Session Layer

Session Layer in the OSI Model is responsible for the establishment of connections, management of connections, and terminations of sessions between two devices. It also provides authentication and security. Protocols used in the Session Layer are NetBIOS, and PPTP.

Functions of the Session Layer

  • Session Establishment, Maintenance, and Termination: The layer allows the two processes to establish, use, and terminate a connection.
  • Synchronization: This layer allows a process to add checkpoints that are considered synchronization points in the data. These synchronization points help to identify the error so that the data is re-synchronized properly, and ends of the messages are not cut prematurely and data loss is avoided.
  • Dialog Controller: The session layer allows two systems to start communication with each other in half-duplex or full-duplex.

Example

Let us consider a scenario where a user wants to send a message through some Messenger application running in their browser. The “Messenger” here acts as the application layer which provides the user with an interface to create the data. This message or so-called Data is compressed, optionally encrypted (if the data is sensitive), and converted into bits (0’s and 1’s) so that it can be transmitted.

Communication in Session Layer

Communication in Session Layer

Layer 6 – Presentation Layer

The presentation layer is also called the Translation layer. The data from the application layer is extracted here and manipulated as per the required format to transmit over the network. Protocols used in the Presentation Layer are JPEG, MPEG, GIF, TLS/SSL, etc.

Functions of the Presentation Layer

  • Translation: For example, ASCII to EBCDIC .
  • Encryption/ Decryption: Data encryption translates the data into another form or code. The encrypted data is known as the ciphertext and the decrypted data is known as plain text. A key value is used for encrypting as well as decrypting data.
  • Compression: Reduces the number of bits that need to be transmitted on the network.

Layer 7 – Application Layer

At the very top of the OSI Reference Model stack of layers, we find the Application layer which is implemented by the network applications. These applications produce the data to be transferred over the network. This layer also serves as a window for the application services to access the network and for displaying the received information to the user. Protocols used in the Application layer are SMTP, FTP, DNS, etc.

application-layer-in-OSI

Application Layer

Functions of the Application Layer

The main functions of the application layer are given below.

  • Network Virtual Terminal(NVT): It allows a user to log on to a remote host.
  • File Transfer Access and Management(FTAM): This application allows a user to access files in a remote host, retrieve files in a remote host, and manage or control files from a remote computer.
  • Mail Services: Provide email service.
  • Directory Services: This application provides distributed database sources and access to global information about various objects and services.
============================================================

"This Content Sponsored by Buymote Shopping app

BuyMote E-Shopping Application is One of the Online Shopping App

Now Available on Play Store & App Store (Buymote E-Shopping)

Click Below Link and Install Application: https://buymote.shop/links/0f5993744a9213079a6b53e8

Sponsor Content: #buymote #buymoteeshopping #buymoteonline #buymoteshopping #buymoteapplication"

===========================================================================

Monday, December 2, 2024

Simple Mail Transfer Protocol (SMTP):Model of SMTP System,How does SMTP Work,The SMTP model is of two types

Simple Mail Transfer mechanism (SMTP) is a mechanism for exchanging email messages between servers. It is an essential component of the email communication process and operates at the application layer of the TCP/IP protocol stack. SMTP is a protocol for transmitting and receiving email messages. In this article, we are going to discuss every point about SMTP.

What is Simple Mail Transfer Protocol?Simple Mail Transfer ProtocolSMTP Protocol

  • End-to-End Method
  • Store-and-Forward Method
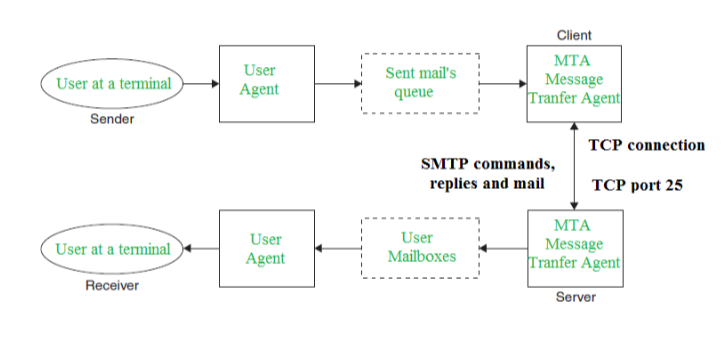
The client SMTP initiates the session, so let us call it the client SMTP. The server SMTP responds to the session request, so let us call it the receiver SMTP. The client SMTP starts the session, and the receiver SMTP responds to the request. 
Model of SMTP System: SMTP ModelComponents of SMTP
  • Mail User Agent (MUA): It is a computer application that helps you in sending and retrieving mail. It is responsible for creating email messages for transfer to the mail transfer agent(MTA).
  • Mail Submission Agent (MSA): It is a computer program that receives mail from a Mail User Agent(MUA) and interacts with the Mail Transfer Agent(MTA) for the transfer of the mail.
  • Mail Transfer Agent (MTA): It is software that has the work to transfer mail from one system to another with the help of SMTP.
  • Mail Delivery Agent (MDA): A mail Delivery agent or Local Delivery Agent is basically a system that helps in the delivery of mail to the local system. 

Monday, November 25, 2024

How to delete the "Showing posts with LABEL" message in Blogger and How to change the format of the "Showing posts with LABEL" message

You can remove the "Showing posts with Label.   Show all posts" message in two ways.

Option 1: Obliterate the code:


To do this,

1  Edit your template in the usual way

2  Find the following text
<b:includable id='status-message'>
<b:if cond='data:navMessage'>
<div class='status-msg-wrap'>
<div class='status-msg-body'>
<data:navMessage/>
</div>
<div class='status-msg-border'>
<div class='status-msg-bg'>
<div class='status-msg-hidden'><data:navMessage/></div>
</div>
</div>
</div>
<div style='clear: both;'/>
</b:if>
</b:includable>


3   Delete that text and replace it with
<b:includable id='status-message'>
<b:if cond='data:navMessage'>
<div>
</div>
<div style='clear: both;'/>
</b:if>
</b:includable>

(If you delete the text and do not put the replacement in, then Blogger may add that section again later.)


Option 2:  Hiding the message using CSS


To do this, add  this CSS rule to your template in the usual way:
.status-msg-wrap,
.status-msg-body {
display: none;
}
(This approach is less risky because you do not need to edit your template, and because it's easier to change later.   But some people have reported that on their template, it has not worked.)

How to change the format of the "Showing posts with LABEL" message

Some people don't mind the actual  "Showing posts with Label.   Show all posts" message.   But they want to format it in a way that suits their blog's layout and colour scheme.

This is easily done, by adding some extra CSS rules to your template in the usual way.

To change the format of the message text, use rules like this:
.status-msg-body {
text-align: left;
line-height: 1.4;   
font-weight: bold;
color: red;
padding: 0.5em 0.3em;
width: 100%;
}

To change the grey-shaded background or the box:
.status-msg-wrap {
width: 100%;
margin: 0 auto;   /*  keep the auto statement if the width is less than 100%, so the box is centered */
position: relative;
}

There is a wide range of options - check with CSS reference guides for the options.   You may need to carry out some experiments with your template and how it looks with various options to decide on the best combination for your blog.

How to change the "Showing posts with LABEL" message

There are several ways that you can change the text in the "Showing posts with Label.   Show all posts" message.

Option 1:   Just replace it with some text

To show a sentence of your own instead of Blogger's standard message, 

1  Edit your template in the usual way

2  Find the following text
<b:includable id='status-message'>
<b:if cond='data:navMessage'>
<div class='status-msg-wrap'>
<div class='status-msg-body'>
<data:navMessage/>
</div>
<div class='status-msg-border'>
<div class='status-msg-bg'>
<div class='status-msg-hidden'><data:navMessage/></div>
</div>
</div>
</div>
<div style='clear: both;'/>
</b:if>
</b:includable>

3   Replace the line in bold (ie <data:navMessage/> ) with your own words.

For example, you might say
<b:includable id='status-message'>
<b:if cond='data:navMessage'>
<div class='status-msg-wrap'>
<div class='status-msg-body'>
Posts in this category include (use the Older Posts link to see previous posts):
</div>
<div class='status-msg-border'>
<div class='status-msg-bg'>
<div class='status-msg-hidden'><data:navMessage/></div>
</div>
</div>
</div>
<div style='clear: both;'/>
</b:if>
</b:includable>

To show the searched-for label value in your message, you need to use the   <data:blog.searchLabel/>   tag. For example, you might say
<b:includable id='status-message'>
<b:if cond='data:navMessage'>
<div class='status-msg-wrap'>
<div class='status-msg-body'>
Posts about <data:blog.searchLabel/>  include (use the Older Posts link to see previous posts):
</div>
<div class='status-msg-border'>
<div class='status-msg-bg'>
<div class='status-msg-hidden'><data:navMessage/></div>
</div>
</div>
</div>
<div style='clear: both;'/>
</b:if>
</b:includable>

Note:  if you are going to use this tag, then you need to choose your label values very carefully so that they all make sense.   For example, in one blog I have some posts labelled "For quiz organizers" and others labelled "Finance", "Organisation" etc.    There is no way that I can write a sentence including the labels that makes sense for both of these.

============================================================

"This Content Sponsored by Buymote Shopping app

BuyMote E-Shopping Application is One of the Online Shopping App

Now Available on Play Store & App Store (Buymote E-Shopping)

Click Below Link and Install Application: https://buymote.shop/links/0f5993744a9213079a6b53e8

Sponsor Content: #buymote #buymoteeshopping #buymoteonline #buymoteshopping #buymoteapplication"

===========================================================================


Wednesday, November 20, 2024

what are the tips needs to follow the blogger creation,Choose Your Blog Topic,Create Your Subtitles

Creating a blog post requires clear structure and organization. Here’s a step-by-step guide on.

Step-by-Step Process:

  1. Choose Your Blog Topic:

    • Select a topic that is specific enough to be covered in 600 words but broad enough to provide useful information.
    • Examples: "How to Stay Productive While Working from Home", "Top Tips for Healthy Eating", "The Benefits of Exercise for Mental Health".
  2. Create Your Subtitles (Headings):

    • Think of five key points or sections that you want to cover within your topic. These will become your subtitles.
    • Ensure each subtitle introduces a distinct aspect of the topic.
    • Example for "How to Stay Productive While Working from Home":
      1. Set Up a Dedicated Workspace
      2. Create a Structured Daily Routine
      3. Minimize Distractions
      4. Use Productivity Tools
      5. Take Breaks and Rest


  1. Write Your Introduction (Approx. 60-80 words):

    • Your introduction should briefly introduce the topic and set the stage for the content under the subtitles.
    • Example: "Working from home can be a dream for many, but it comes with its own set of challenges. Staying productive requires discipline, the right tools, and effective habits. Here are some tips to help you boost productivity while working remotely."
  2. Write Content Under Each Subtitle (Approx. 100-110 words per subtitle):

    • Subtitle 1: Provide a brief explanation or advice related to the first key point.
    • Subtitle 2: Discuss the second aspect, offering tips or details.
    • Subtitle 3: Continue with the next aspect, providing valuable information.
    • Subtitle 4: Write the fourth point, continuing the pattern of concise but informative writing.
    • Subtitle 5: Conclude with a final piece of advice or a call to action.

    Example for each section:

    • Set Up a Dedicated Workspace
      "One of the most important steps in maintaining productivity at home is having a dedicated workspace. Choose a quiet spot away from distractions, and make it your designated office area. This helps your brain associate this space with work, boosting focus and performance."

    • Create a Structured Daily Routine
      "Without a daily routine, it’s easy to become disorganized or lose track of time. Start your day with a morning routine that includes setting goals, prioritizing tasks, and scheduling breaks. Having a structured day will help you stay on task and manage time effectively."

    • Minimize Distractions
      "Minimizing distractions is essential for staying productive at home. Turn off notifications on your phone, avoid social media during work hours, and let family or roommates know when you're in a work-focused environment to reduce interruptions."

    • Use Productivity Tools
      "There are numerous tools designed to boost productivity. Consider using task management apps like Trello or Asana, and time tracking apps like Toggl to help you stay on top of your work. These tools will help you organize tasks, meet deadlines, and stay focused."

Wednesday, November 13, 2024

1 ம் நாள் அக்டோபர் 2024 - நடப்பு நிகழ்வுகள்: மூத்த குடிமக்கள் தினம், தேசிய காப்பீடு விழிப்புணர்வு மாதம் தொடக்கம், மகாத்மா காந்தி ஜெயந்தி முன்னோட்டம்

 1 அக்டோபர் 2024 இல் உலகம் முழுவதும் பல முக்கிய நிகழ்வுகள் மற்றும் விழிப்புணர்வு தினங்கள் கொண்டாடப்படுகின்றன. இந்நாளில் முக்கியமான நிகழ்வுகள், அரசியல் மாற்றங்கள், மற்றும் சமூகத்தில் பெரும் தாக்கத்தை ஏற்படுத்தும் முக்கிய செயல்பாடுகள் நடைபெறுகின்றன.

1. மூத்த குடிமக்கள் தினம் (International Day of Older Persons)

ஒவ்வொரு ஆண்டும் அக்டோபர் 1 அன்று “மூத்த குடிமக்கள் தினம்” உலகம் முழுவதும் கொண்டாடப்படுகிறது. இந்நாளில் மூத்த குடிமக்களுக்கு அஞ்சலி செலுத்தி, அவர்களின் வாழ்வின் முக்கியத்துவம் மற்றும் அர்ப்பணிப்பை போற்றுவதற்கான விழிப்புணர்வு நிகழ்ச்சிகள் நடத்தப்படுகின்றன. மேலும், அவர்கள் எதிர்நோக்கும் சவால்கள் மற்றும் அவர்களுக்கான ஆதரவு முக்கியமாக பேசப்படும்.


2. தேசிய காப்பீடு விழிப்புணர்வு மாதம் தொடக்கம்

அக்டோபர் மாதம் இந்தியாவில் “தேசிய காப்பீடு விழிப்புணர்வு மாதம்” என கொண்டாடப்படுகிறது. காப்பீட்டு நிறுவனங்கள் மக்கள் மத்தியில் காப்பீட்டின் முக்கியத்துவத்தை அறிவிக்கும் வகையில் பல்வேறு விழிப்புணர்வு நிகழ்ச்சிகளை நடத்துகின்றன. சுகாதார, சொத்து, மற்றும் வாழ்க்கை காப்பீட்டுகள் குறித்த விழிப்புணர்வை அதிகரிக்க சலுகைகள் மற்றும் புதிய திட்டங்கள் அறிமுகப்படுத்தப்படுகின்றன.

3. மகாத்மா காந்தி ஜெயந்தி முன்னோட்டம்

இந்தியாவின் தந்தை மகாத்மா காந்தியின் பிறந்த நாள் அக்டோபர் 2 அன்று கொண்டாடப்படவிருக்கிறது. இதற்கான முன்னோட்டமாக, 1 அக்டோபர் அன்று பல இடங்களில் சுத்தம் மற்றும் சமாதானத்தை முன்னெடுத்து மாபெரும் நிகழ்ச்சிகள் நடைபெறுகின்றன. பல்வேறு சமூக, அரசியல் அமைப்புகள் காந்தியின் வாழ்க்கை மற்றும் கொள்கைகளை மக்கள் மத்தியில் பரப்புகின்றன.

4. இந்திய பொருளாதார நிலை

1 அக்டோபர் 2024 இல் இந்தியாவின் பொருளாதார நிலை குறித்த பல முக்கிய அறிவிப்புகள் எதிர்பார்க்கப்படுகின்றன. புதிய அரசியல் மற்றும் பொருளாதார மாற்றங்கள் மூலம் பொருளாதார வளர்ச்சியை ஊக்குவிக்க புதிய நடவடிக்கைகள் மேற்கொள்ளப்படும் என எதிர்பார்க்கப்படுகிறது. கையிருப்பு விகிதங்கள் மற்றும் விலை நிலை குறித்த தகவல்கள் வெளியிடப்படலாம்.

5. பருவநிலை மாற்றம் மற்றும் விவசாயம்

அக்டோபர் மாதம் பருவநிலை மாற்றத்தின் தாக்கம் விவசாய துறையில் அதிகமாகவே காணப்படுகிறது. 1 அக்டோபர் அன்று இந்தியாவின் பல மாநிலங்களில் பருவநிலை மாற்றத்தின் விளைவுகள் விவசாயிகள் மத்தியில் முக்கியமான விவாதமாக இருக்கின்றது. இந்த நேரத்தில் மழைக்காலம் முடிவடையும் நிலையில், பயிர்க் கொய்தல் நேரத்தில் ஏற்படும் சவால்கள் விவசாயிகளின் வாழ்வில் தாக்கத்தை ஏற்படுத்துகின்றன.

6. உலக இதய தினம் விழிப்புணர்வு

உலக இதய தினம் செப்டம்பர் 29 அன்று கொண்டாடப்பட்டு வருகிறது, ஆனால் அக்டோபர் மாதத்தின் முதல் வாரத்தில் இதற்கான விழிப்புணர்வு நிகழ்ச்சிகள் தொடர்ந்து நடைபெறுகின்றன. இதய ஆரோக்கியம் மற்றும் நோய் தடுப்பு முறைகளை முன்னெடுத்து பல்வேறு மருத்துவ முகாம்கள் மற்றும் சுகாதார நிகழ்ச்சிகள் இந்தியா முழுவதும் நடைபெறுகின்றன.

=======================================================

"This Content Sponsored by Genreviews.Online

Genreviews.online is One of the Review Portal Site

Website Link: https://genreviews.online/

Sponsor Content: #genreviews.online, #genreviews, #productreviews, #bestreviews, #reviewportal"

========================================================

Tuesday, November 5, 2024

Creating a website can be an exciting project, whether for personal use, a business, or a blog. Here’s a step-by-step tutorial to guide you through the process of building a website from scratch.

 Define Your Purpose and Goals

Before you start building your website, defining its purpose is crucial. Ask yourself:

  • What is the main objective of the website? (e.g., blog, portfolio, e-commerce)
  • Who is your target audience?
  • What content will you provide? Setting clear goals will guide your design and content choices, helping you create a focused and effective website.

Choose a Domain Name

Your domain name is your website’s online address (e.g., www.yourwebsite.com). Here are some tips for selecting a great domain name:

  • Keep it short and memorable: Avoid long and complex names.
  • Use relevant keywords: Include words related to your content or business for better SEO.
  • Check availability: Use domain registration sites like GoDaddy or Namecheap to ensure your desired name is available. Register the perfect name through a domain registrar once you’ve found the perfect name.


Select a Hosting Provider

Web hosting is where your website files are stored. Choosing a reliable hosting provider is essential. Consider these factors:

  • Uptime: Look for a host with a high uptime percentage (99.9% or higher).
  • Customer support: Choose a host that offers 24/7 support.
  • Pricing and plans: Compare different plans and choose one that fits your budget and needs. Popular hosting providers include Bluehost, SiteGround, and HostGator.
Youtube Channel Image
Nadaipazhagu Tamizhaa Subscribe To watch Videos
Subscribe